Gluten-free Easter Nest Cake is made with ground almonds instead of flour. It has a whipped-cream and chocolate topping with a nest of chocolate flake and mini eggs.
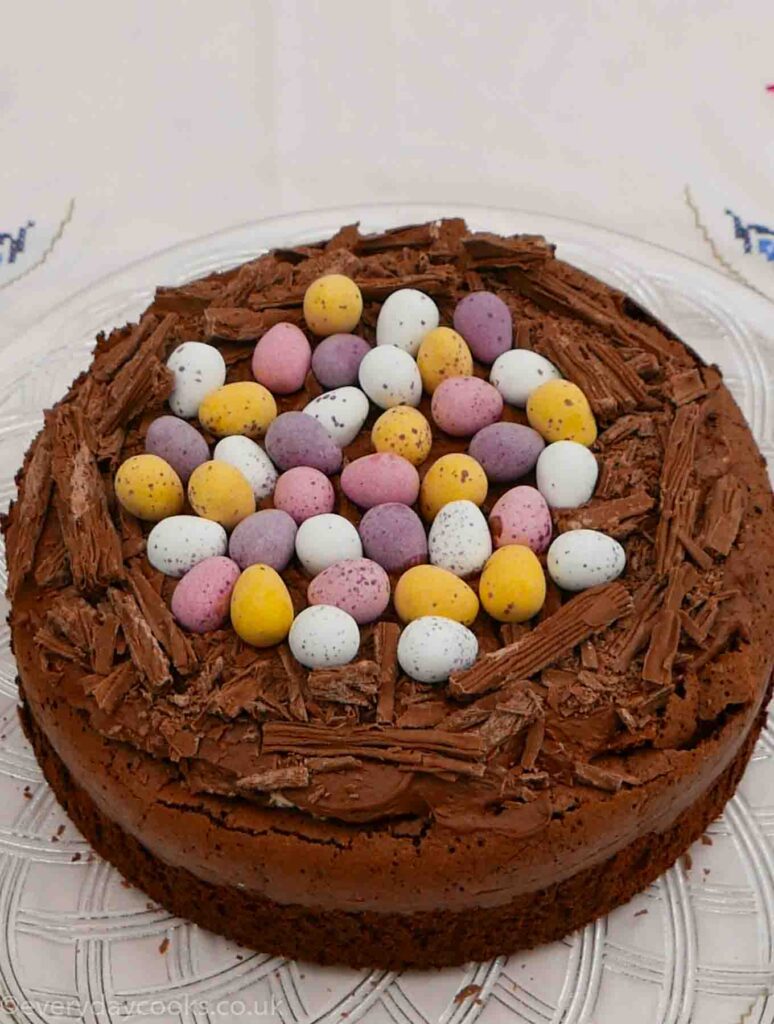
Easter Nest Cake
Easter Nest Cake is an alternative to a traditional Simnel Cake for Easter, although I suppose if you were really traditional you would have given the Simnel Cake to your mother three weeks earlier on Mothering Sunday, as I did with my Orange Simnel Cake. As the Easter Nest Cake is lovely for dessert too, I suppose you could have both cakes at Easter.
Gluten-free Chocolate Cake
The basic cake is one that I've made many times, as I have a few friends and relations who have coeliac disease. I think it's a real bonus to have a recipe like this that is good on its own, rather than always adapting recipes with flour.
If you are making the Easter Nest Cake for someone with coeliac, do check that the chocolate and chocolate eggs you use are gluten-free and haven't been made in an environment that processes wheat products. Fortunately, the allergy labelling on UK and EU products is very clear about this.
The cake is quite light without flour, and the raising comes from the eggs, which are separated and the whites whipped separately. The trapped air then expands as the cake cooks. It's baked in a 20cm deep round cake tin and can look a bit shallow before it's cooked - but it will rise! As always, line with a baking parchment circle. If your tin is a good quality you won't need to grease the sides, which is better for this cake.
How to successfully melt chocolate
The chocolate flavour is all from melted chocolate. I used to melt chocolate in the microwave - and it is quicker - but it's safer to melt over a pan of hot water because it's more controlled.
It does add an extra 10 minutes or so to the preparation, as you have to do two lots of melting, but you can prepare everything else while it's slowly doing its thing. Another advantage is that melting chocolate slowly means that it's less likely to be very hot, so you don't need to cool it for so long,
But I'm also an advocate of doing what works for you, so if you swear by the microwave - carry on.
The secrets to chocolate melting success over water are:
- Don't let the bowl touch the water. Use a much larger bowl for the chocolate than your saucepan
- Don't let the water boil (although this isn't immediately terminal as long as 1. is observed).
For detailed instructions on ways of melting chocolate see How to Melt Chocolate
What's on top of Easter Nest Cake?
The topping for the Easter Nest Cake, and the base of the nest, is whipped cream mixed with more melted chocolate - there is a lot of chocolate in this cake. I used chocolate with 50-60% cocoa solids for this but when I make the cake for a dessert without the Easter Eggs I often use a darker chocolate. Then just crumble flakes for the nest and place as many little chocolate eggs in the nest as you can. And enjoy. Happy Easter!
If you like this...
...Why don’t you try:
Simnel Cupcakes
Easter Nest Cupcakes
Easter Rocky Road
Recipe
Easter Nest Cake
Ingredients
For the cake:
- 200 g plain chocolate, minimum 50% cocoa solids
- 100 g butter
- 5 large eggs
- 150 g caster sugar
- 1 teaspoon vanilla extract (5ml)
- 125 g ground almonds
For the topping:
- 125 g plain chocolate minimum 50% cocoa solids
- 250 ml double cream
- 1 teaspoon vanilla extract (5ml)
- 2-3 chocolate flakes
- 1-2 small packets chocolate mini eggs
Equipment
Instructions
Preparation:
- Boil the kettle
- Set the oven to 190°C/ 170°C fan/ gas mark 5/ 375°F
- Line the base of the tin with a parchment liner
For the cake:
- Melt the chocolate with the butter in a bowl over a small pan of water, ensuring the bowl doesn't touch the water and the water doesn't boil. This takes about 15 minutesFor detailed instructions see How to Melt Chocolate
- Separate 4 of the eggs (see Note)
- Put the 4 yolks plus the whole egg in a large bowl with the caster sugar and vanilla extract and whisk until thick and pale
- When the chocolate and butter have melted, let them cool slightly and stir into the egg yolk mixture with the ground almonds.Always add warm ingredients to cooler ones for a smooth mixture
- In a separate bowl whisk the 4 egg whites until firm but not dry
- Carefully fold the egg whites into the egg yolk mixture with a large metal spoon (see Note).The aim is to keep the air in the mixture, so use the edge of the spoon to cut into the mixture, then lift. What you don't want to do is beat the air out or the cake won't rise
- Spoon the mixture into the prepared cake tin and cook for 40-45 minutes until a skewer comes out clean
- Leave to cool in the tin for 10 minutes. Turn out carefully onto a wire rack to cool completely.
For the topping and decoration:
- Carefully move the cake to a serving plate.Don't worry if it has sunk slightly in the middle - that's what you want for a nest
- Melt the chocolate as above and allow to cool slightly
- Whip the cream with the vanilla extract until it is getting firm, but is still soft
- Fold the chocolate into the cream - I use a palette knife for this.You will see the mixture start to thicken as the chocolate cools
- Spread the chocolate cream over the top of the cake
- Cut the flakes into halves and use the point of a knife to separate into thinner flakes
- Use these flakes to make a nest on the outer 2-3 cm of the cake
- Arrange the chocolate eggs in the nest.
Video
Notes
- Always separate each egg individually, putting the white into a cup before putting in the bowl. This way you avoid contaminating all of your whites with egg yolk if you break the yolk. Egg whites won't whip up if there is any speck of egg yolk (or any fat/grease) in with them
- If you have a stand mixer and a hand mixer, whip the egg whites in the stand mixer - it's much less effort
- Use the largest metal spoon you have for folding in. I use a large cooking spoon - like a draining spoon without holes



Peter says
Can you make this with two cakes so that a filling can be included?
Susie Collings says
Hi Peter, This cake isn't very thick so I'd be inclined to make it in 2 18cm/7-inch tins if you want to fill it, which will give a smaller, thicker cake. Test after 25 minutes to see if they're done.